• Product
  • Pricing
  • Docs
  • Using PostHog
  • Community
  • Company
  • Login
  • Docs

  • Overview
    • Quickstart with PostHog Cloud
    • Overview
      • AWS
      • Azure
      • DigitalOcean
      • Google Cloud Platform
      • Hobby
      • EU Hosting Companies
      • Other platforms
      • Instance settings
      • Environment variables
      • Securing PostHog
      • Monitoring with Grafana
      • Running behind a proxy
      • Configuring email
      • Helm chart configuration
      • Deploying ClickHouse using Altinity.Cloud
      • Configuring Slack
      • Overview
        • Overview
        • Upgrade notes
        • Overview
        • 0001-events-sample-by
        • 0002_events_sample_by
        • 0003_fill_person_distinct_id2
        • ClickHouse
          • Backup
          • Debug hanging / freezing process
          • Horizontal scaling (Sharding & replication)
          • Kafka Engine
          • Resize disk
          • Restore
          • Vertical scaling
        • Kafka
          • Resize disk
          • Log retention
        • PostgreSQL
          • Resize disk
          • Troubleshooting long-running migrations
        • Plugin server
        • MinIO
        • Redis
        • Zookeeper
      • Disaster recovery
    • Troubleshooting and FAQs
    • Support for self-hosting (open-source and enterprise)
    • Managing hosting costs
    • Overview
    • Ingest live data
    • Ingest historical data
    • Identify users
    • User properties
    • Deploying a reverse proxy
    • Library comparison
    • Badge
    • Browser Extensions
      • Snippet installation
      • Android
      • iOS
      • JavaScript
      • Flutter
      • React Native
      • Node.js
      • Go
      • Python
      • Rust
      • Java
      • PHP
      • Ruby
      • Elixir
      • Docusaurus v2
      • Gatsby
      • Google Tag Manager
      • Next.js
      • Nuxt.js
      • Retool
      • RudderStack
      • Segment
      • Sentry
      • Slack
      • Shopify
      • WordPress
      • Message formatting
      • Microsoft Teams
      • Slack
      • Discord
    • To another self-hosted instance
    • To PostHog from Amplitude
    • To PostHog Cloud EU
    • Between Cloud and self-hosted
    • Overview
    • Tutorial
    • Troubleshooting
    • Developer reference
    • Using the PostHog API
    • Jobs
    • Testing
    • TypeScript types
    • Overview
    • POST-only public endpoints
    • Actions
    • Annotations
    • Cohorts
    • Dashboards
    • Event definitions
    • Events
    • Experiments
    • Feature flags
    • Funnels
    • Groups
    • Groups types
    • Insights
    • Invites
    • Members
    • Persons
    • Plugin configs
    • Plugins
    • Projects
    • Property definitions
    • Session recordings
    • Trends
    • Users
    • Data model
    • Overview
    • Data model
    • Ingestion pipeline
    • ClickHouse
    • Querying data
    • Overview
    • GDPR guidance
    • HIPAA guidance
    • CCPA guidance
    • Data egress & compliance
    • Data deletion
    • Overview
    • Code of conduct
    • Recognizing contributions
  • Using PostHog

  • Table of contents
      • Dashboards
      • Funnels
      • Group Analytics
      • Insights
      • Lifecycle
      • Path analysis
      • Retention
      • Stickiness
      • Trends
      • Heatmaps
      • Session Recording
      • Correlation Analysis
      • Experimentation
      • Feature Flags
      • Actions
      • Annotations
      • Cohorts
      • Data Management
      • Events
      • Persons
      • Sessions
      • UTM segmentation
      • Team collaboration
      • Organizations & projects
      • Settings
      • SSO & SAML
      • Toolbar
      • Notifications & alerts
    • Overview
      • Amazon Kinesis Import
      • BitBucket Release Tracker
      • Event Replicator
      • GitHub Release Tracker
      • GitHub Star Sync
      • GitLab Release Tracker
      • Heartbeat
      • Ingestion Alert
      • Email Scoring
      • n8n Connector
      • Orbit Connector
      • Redshift Import
      • Segment Connector
      • Shopify Connector
      • Twitter Followers Tracker
      • Zendesk Connector
      • Airbyte Exporter
      • Amazon S3 Export
      • BigQuery Export
      • Customer.io Connector
      • Databricks Export
      • Engage Connector
      • GCP Pub/Sub Connector
      • Google Cloud Storage Export
      • Hubspot Connector
      • Intercom Connector
      • Migrator 3000
      • PagerDuty Connector
      • PostgreSQL Export
      • Redshift Export
      • RudderStack Export
      • Salesforce Connector
      • Sendgrid Connector
      • Sentry Connector
      • Snowflake Export
      • Twilio Connector
      • Variance Connector
      • Zapier Connector
      • Downsampler
      • Event Sequence Timer
      • First Time Event Tracker
      • Property Filter
      • Property Flattener
      • Schema Enforcer
      • Taxonomy Standardizer
      • Unduplicator
      • Automatic Cohort Creator
      • Currency Normalizer
      • GeoIP Enricher
      • Timestamp Parser
      • URL Normalizer
      • User Agent Populator
  • Tutorials
    • All tutorials
    • Actions
    • Apps
    • Cohorts
    • Dashboards
    • Feature flags
    • Funnels
    • Heatmaps
    • Path analysis
    • Retention
    • Session recording
    • Trends
  • Support
  • Glossary
  • Docs
  • Self-host
  • Deployments
  • DigitalOcean

Deploying to DigitalOcean

Last updated: Oct 25, 2022

On this page

  • 1-click install
  • Securing your 1-click install
  • 1. Update PostHog
  • 2. Install ClusterIssuer
  • 3. Lookup the address of the installation
  • 4. Setting up DNS
  • Install via doctl
  • Manual install
  • 1. Chart configuration
  • 2. Install the chart
  • 3. Lookup the address of the installation
  • 4. Setting up DNS
  • Upgrading the chart
  • Uninstalling the chart
  • Next steps

Self-host vs PostHog Cloud:
Self-hosting PostHog means managing the service yourself, taking care of upgrades, scaling, security etc.

If you are less technical or looking for a hands-off experience, and if you want to optimize your budget, we recommend PostHog Cloud.

PostHog Cloud is also considerably cheaper than paying for cloud hosting. You can find more information about PostHog Cloud's costs on the pricing page.

You can also find support partners to manage the service for you via the PostHog Marketplace.

DigitalOcean is one of the most well-established Cloud Providers. Compared to AWS, GCP and Azure where the amount of options and configuration can be overwhelming, DigitalOcean is generally simpler to use and faster to get running.

The first thing you'll need is a get a DigitalOcean account. You can click on the badge below to get US$100 in credit over 60 days (i.e. run PostHog for free for ~2 months).

DigitalOcean Referral Badge

Then you can either follow the 1-click install or the manual install.

1-click install

Click here to deploy PostHog using the 1-click install. The DigitalOcean UI will ask you if you want to install PostHog on an already provisioned Kubernetes cluster or if you want to create a new one.

Once the setup is completed, you can pick one of those two methods to fetch the URL of your fresh new PostHog installation:

  1. In the DigitalOcean console, go to the Resources tab of your Kubernetes cluster and click on the load balancer assigned to the cluster. This will bring you to the (networking tab) where you can get the IP address of the load balancer created by Kubernetes:

    DigitalOcean External IP location

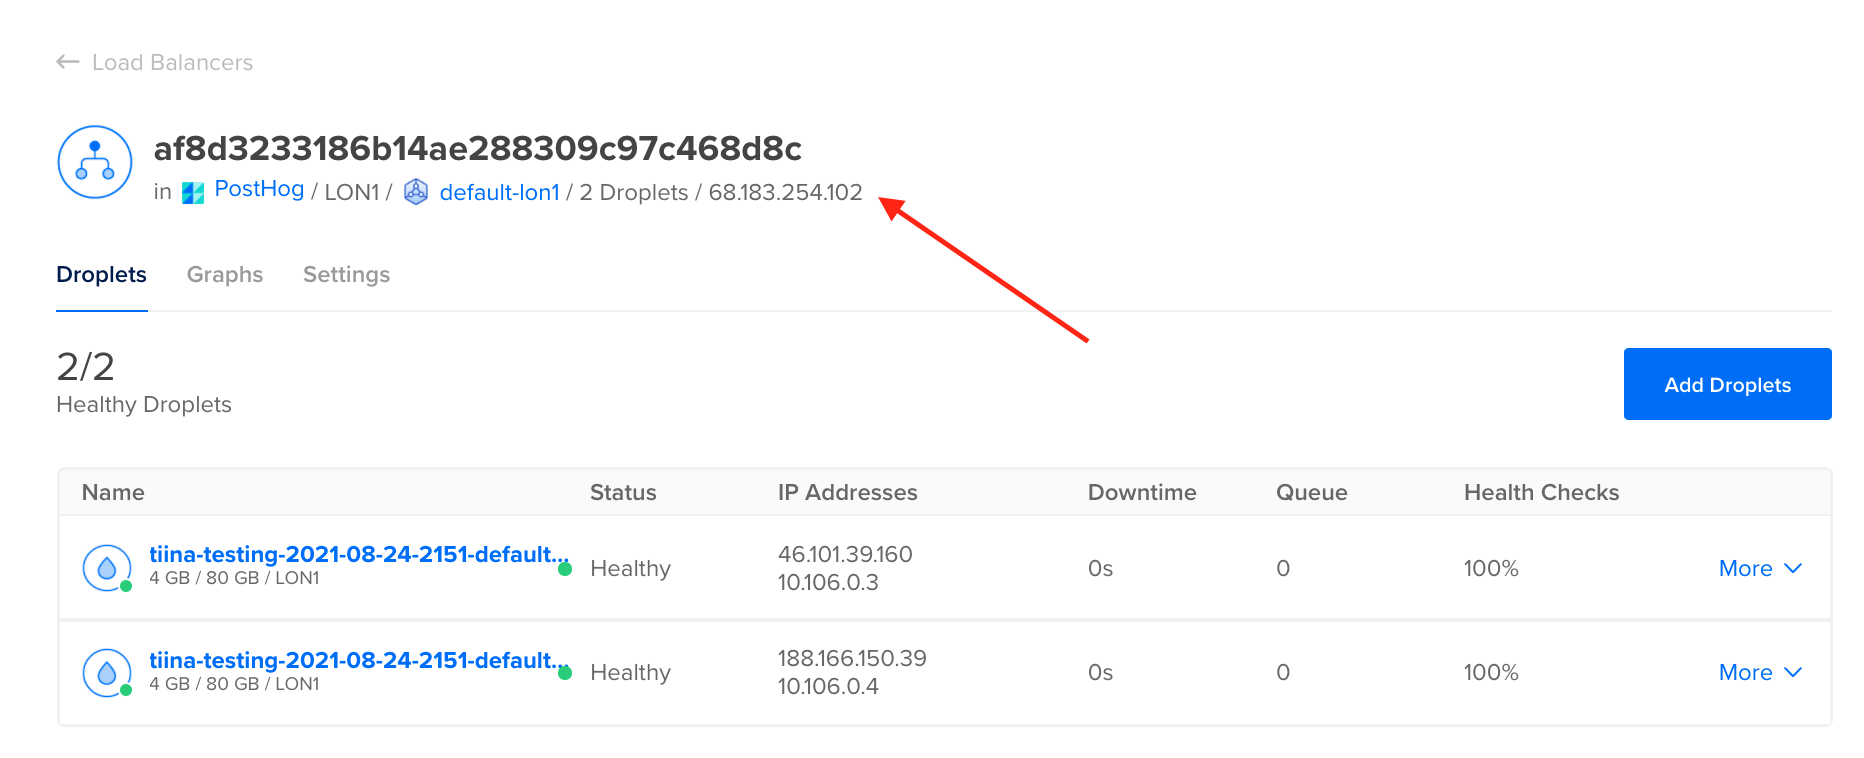
  2. If you have configured kubectl access to your cluster, run the following commands:

    Terminal
    POSTHOG_IP=$(kubectl get --namespace posthog ingress posthog -o jsonpath="{.status.loadBalancer.ingress[0].ip}" 2> /dev/null)
    POSTHOG_HOSTNAME=$(kubectl get --namespace posthog ingress posthog -o jsonpath="{.status.loadBalancer.ingress[0].hostname}" 2> /dev/null)
    if [ -n "$POSTHOG_IP" ]; then
    POSTHOG_INSTALLATION=$POSTHOG_IP
    fi
    if [ -n "$POSTHOG_HOSTNAME" ]; then
    POSTHOG_INSTALLATION=$POSTHOG_HOSTNAME
    fi
    if [ ! -z "$POSTHOG_INSTALLATION" ]; then
    echo -e "\n----\nYour PostHog installation is available at: http://${POSTHOG_INSTALLATION}\n----\n"
    else
    echo -e "\n----\nUnable to find the address of your PostHog installation\n----\n"
    fi

Note: before using PostHog in production remember to secure your 1-click installation. Without securing your instance you will only be able to test web apps on HTTP such as those running on localhost.

Securing your 1-click install

It's unfortunately not yet possible to provide parameters to DigitalOcean 1-click installations, so we need a post-install step to enable TLS. In order to do this you will need kubectl and Helm installed and have configured your kubectl access.

1. Update PostHog

Create a values.yaml file in the current directory with the following content:

values.yaml
cloud: 'do'
ingress:
hostname: <your-hostname>
nginx:
enabled: true
cert-manager:
enabled: true

Note: if you are planning to use our GeoIP integration, please also add the snippet below to enable proxy protocol support in the load balancer and in the nginx ingress controller:

values.yaml
#
# For DigitalOcean LB (TCP) mode, we need to enable some additional config
# in the ingress controller in order to get the proper IP address forwarded
# to our app. Otherwise we'll get the load balancer nodes addresses instead.
#
# ref:
# - https://kubernetes.github.io/ingress-nginx/user-guide/miscellaneous/#source-ip-address
# - https://docs.digitalocean.com/products/networking/load-balancers/
#
#
# Additionally we'll also enable pod communication through the Load Balancer
# to ensure Let's Encrypt can reach the cert-manager Pod validating our domain.
#
# ref:
# - https://github.com/kubernetes/ingress-nginx/issues/3996
# - https://www.digitalocean.com/community/tutorials/how-to-set-up-an-nginx-ingress-with-cert-manager-on-digitalocean-kubernetes#step-5-%E2%80%94-enabling-pod-communication-through-the-load-balancer-optional
#
ingress-nginx:
controller:
config:
use-proxy-protocol: true
service:
annotations:
service.beta.kubernetes.io/do-loadbalancer-hostname: <your-hostname>
service.beta.kubernetes.io/do-loadbalancer-enable-proxy-protocol: 'true'

and since you started with the one-click deploy you'll need the Helm chart locally, so run:

Terminal
helm repo add posthog https://posthog.github.io/charts-clickhouse/
helm repo update

now you can upgrade your cluster with the new values:

Terminal
helm upgrade -f values.yaml --timeout 30m --namespace posthog posthog posthog/posthog --atomic --wait --wait-for-jobs --debug

2. Install ClusterIssuer

Create a new cluster resource that will take care of signing your TLS certificates using Let’s Encrypt.

  1. Create a new file called cluster-issuer.yaml with the following content. Note: please remember to replace your-name@domain.com with a valid email address as you will receive email notifications on certificate renewals:

    cluster-issuer.yaml
    apiVersion: cert-manager.io/v1
    kind: ClusterIssuer
    metadata:
    name: letsencrypt-prod
    spec:
    acme:
    email: "your-name@domain.com"
    server: https://acme-v02.api.letsencrypt.org/directory
    privateKeySecretRef:
    name: posthog-tls
    solvers:
    - http01:
    ingress:
    class: nginx
  2. Deploy this new resource to your cluster by running: kubectl apply -f cluster-issuer.yaml

3. Lookup the address of the installation

Terminal
POSTHOG_IP=$(kubectl get --namespace posthog ingress posthog -o jsonpath="{.status.loadBalancer.ingress[0].ip}" 2> /dev/null)
POSTHOG_HOSTNAME=$(kubectl get --namespace posthog ingress posthog -o jsonpath="{.status.loadBalancer.ingress[0].hostname}" 2> /dev/null)
if [ -n "$POSTHOG_IP" ]; then
POSTHOG_INSTALLATION=$POSTHOG_IP
fi
if [ -n "$POSTHOG_HOSTNAME" ]; then
POSTHOG_INSTALLATION=$POSTHOG_HOSTNAME
fi
if [ ! -z "$POSTHOG_INSTALLATION" ]; then
echo -e "\n----\nYour PostHog installation is available at: http://${POSTHOG_INSTALLATION}\n----\n"
else
echo -e "\n----\nUnable to find the address of your PostHog installation\n----\n"
fi

Note: due to a limitation in the DigitalOcean ingress controller, the second method will not work if you have enabled the settings to support the GeoIP integration. Please use the web UI to get your IP address.

4. Setting up DNS

Do not use posthog or tracking related words as your sub-domain record: As we grow, PostHog owned domains might be added to tracker blockers. To reduce the risk of tracker blockers interfering with events sent to your self-hosted instance, we suggest to avoid using any combination of potentially triggering words as your sub-domain. Examples of words to avoid are: posthog, tracking, tracker, analytics, metrics.

Create the record of your desired hostname pointing to the address found above. After around 30 minutes (required to request, receive and deploy the TLS certificate) you should have a fully working and secure PostHog instance available at the domain record you've chosen!

Install via doctl

If you have doctl already configured you can simply run:

Terminal
doctl kubernetes cluster create \
posthog-cluster \
--count=2 \
--size="s-2vcpu-4gb" \
--1-clicks=posthog

This will also configure your kubectl access.

Manual install

First, we need to set up a Kubernetes cluster (see the official DigitalOcean documentation for more info).

Cluster requirements

  • Kubernetes version >=1.23 <= 1.25

  • Kubernetes nodes:

    • ensure you have enough resources available (we suggest a total minimum of 4 vcpu & 8GB of memory)
    • ensure you can run x86-64/amd64 workloads. arm64 architecture is currently not supported
  • Suggestion: ensure allowVolumeExpansion is set to True in the storage class definition (this setting enables PVC resize)

    Details

    PersistentVolumes can be configured to be expandable. This feature when set to true, allows the users to resize the volume by editing the corresponding PersistentVolumeClaims object.

    This can become useful in case your storage usage grows and you want to resize the disk on-the-fly without having to resync data across PVCs.

    To verify if your storage class allows volume expansion you can run:

    Terminal
    kubectl get storageclass -o json | jq '.items[].allowVolumeExpansion'
    true

    In case it returns false, you can enable volume expansion capabilities for your storage class by running:

    Terminal
    DEFAULT_STORAGE_CLASS=$(kubectl get storageclass -o=jsonpath='{.items[?(@.metadata.annotations.storageclass\.kubernetes\.io/is-default-class=="true")].metadata.name}')
    kubectl patch storageclass "$DEFAULT_STORAGE_CLASS" -p '{"allowVolumeExpansion": true}'
    storageclass.storage.k8s.io/gp2 patched

    N.B:

    • expanding a persistent volume is a time consuming operation
    • some platforms have a per-volume quota of one modification every 6 hours
    • not all the volume types support this feature. Please take a look at the official docs for more info
  • Suggestion: ensure reclaimPolicy is set to Retain in the storage class definition (this setting allows for manual reclamation of the resource)

    The Retain reclaim policy allows for manual reclamation of the resource. When the PersistentVolumeClaim is deleted, the PersistentVolume still exists and the volume is considered "released". But it is not yet available for another claim because the previous claimant's data remains on the volume (see the official documentation).

    This can become useful in case your need to reprovision a pod/statefulset but you don't want to lose the underlying data

    To verify which reclaimPolicy your default storage class is using you can run:

    Terminal
    kubectl get storageclass -o json | jq '.items[].reclaimPolicy'
    "Retain"

    If your storage class allows it, you can modify the reclaimPolicy by running:

    Terminal
    DEFAULT_STORAGE_CLASS=$(kubectl get storageclass -o=jsonpath='{.items[?(@.metadata.annotations.storageclass\.kubernetes\.io/is-default-class=="true")].metadata.name}')
    kubectl patch storageclass "$DEFAULT_STORAGE_CLASS" -p '{"reclaimPolicy": "Retain"}'
    storageclass.storage.k8s.io/gp2 patched

Note: in order to reduce the overhead of managing stateful services like PostgreSQL, Kafka, Redis and ClickHouse by yourself, we suggest you to run them outside Kubernetes and offload their provisioning, building and maintenance operations:

  • for PostgreSQL, take a look at DigitalOcean managed databases
  • for Apache Kafka, take a look at Confluent Cloud
  • for Redis, take a look at Redis Enterprise Cloud
  • for ClickHouse, take a look at Altinity Cloud

1. Chart configuration

Here's the minimal required values.yaml that we'll be using later. You can find an overview of the parameters that can be configured during installation under configuration.

values.yaml
cloud: 'do'
ingress:
hostname: <your-hostname>
nginx:
enabled: true
cert-manager:
enabled: true

Note: if you are planning to use our GeoIP integration, please also add the snippet below to enable proxy protocol support in the load balancer and in the nginx ingress controller:

values.yaml
#
# For DigitalOcean LB (TCP) mode, we need to enable some additional config
# in the ingress controller in order to get the proper IP address forwarded
# to our app. Otherwise we'll get the load balancer nodes addresses instead.
#
# ref:
# - https://kubernetes.github.io/ingress-nginx/user-guide/miscellaneous/#source-ip-address
# - https://docs.digitalocean.com/products/networking/load-balancers/
#
#
# Additionally we'll also enable pod communication through the Load Balancer
# to ensure Let's Encrypt can reach the cert-manager Pod validating our domain.
#
# ref:
# - https://github.com/kubernetes/ingress-nginx/issues/3996
# - https://www.digitalocean.com/community/tutorials/how-to-set-up-an-nginx-ingress-with-cert-manager-on-digitalocean-kubernetes#step-5-%E2%80%94-enabling-pod-communication-through-the-load-balancer-optional
#
ingress-nginx:
controller:
config:
use-proxy-protocol: true
service:
annotations:
service.beta.kubernetes.io/do-loadbalancer-hostname: <your-hostname>
service.beta.kubernetes.io/do-loadbalancer-enable-proxy-protocol: "true"

2. Install the chart

To install the chart using Helm with the release name posthog in the posthog namespace, run the following:

Terminal
helm repo add posthog https://posthog.github.io/charts-clickhouse/
helm repo update
helm upgrade --install -f values.yaml --timeout 30m --create-namespace --namespace posthog posthog posthog/posthog --wait --wait-for-jobs --debug

Note: if you decide to use a different Helm release name or namespace, please keep in mind you might have to change several values in your values.yaml in order to make the installation successful. This is because we build several Kubernetes resources (like service names) using those.

3. Lookup the address of the installation

Terminal
POSTHOG_IP=$(kubectl get --namespace posthog ingress posthog -o jsonpath="{.status.loadBalancer.ingress[0].ip}" 2> /dev/null)
POSTHOG_HOSTNAME=$(kubectl get --namespace posthog ingress posthog -o jsonpath="{.status.loadBalancer.ingress[0].hostname}" 2> /dev/null)
if [ -n "$POSTHOG_IP" ]; then
POSTHOG_INSTALLATION=$POSTHOG_IP
fi
if [ -n "$POSTHOG_HOSTNAME" ]; then
POSTHOG_INSTALLATION=$POSTHOG_HOSTNAME
fi
if [ ! -z "$POSTHOG_INSTALLATION" ]; then
echo -e "\n----\nYour PostHog installation is available at: http://${POSTHOG_INSTALLATION}\n----\n"
else
echo -e "\n----\nUnable to find the address of your PostHog installation\n----\n"
fi

Note: due to a limitation in the DigitalOcean ingress controller, the second method will not work if you have enabled the settings to support the GeoIP integration. Please use the web UI to get your IP address.

4. Setting up DNS

Do not use posthog or tracking related words as your sub-domain record: As we grow, PostHog owned domains might be added to tracker blockers. To reduce the risk of tracker blockers interfering with events sent to your self-hosted instance, we suggest to avoid using any combination of potentially triggering words as your sub-domain. Examples of words to avoid are: posthog, tracking, tracker, analytics, metrics.

Create the record of your desired hostname pointing to the address found above. After around 30 minutes (required to request, receive and deploy the TLS certificate) you should have a fully working and secure PostHog instance available at the domain record you've chosen!

Upgrading the chart

To upgrade the Helm release posthog in the posthog namespace:

  1. Get and update the Helm repo:

    Terminal
    helm repo add posthog https://posthog.github.io/charts-clickhouse/
    helm repo update
  2. Verify if the operation is going to be a major version upgrade:

    Terminal
    helm list -n posthog
    helm search repo posthog

Compare the numbers of the Helm chart version (in the format posthog-{major}.{minor}.{patch} - for example, posthog-19.15.1) when running the commands above. If the upgrade is for a major version, check the upgrade notes before moving forward.

  1. Run the upgrade

    Terminal
    helm upgrade -f values.yaml --timeout 30m --namespace posthog posthog posthog/posthog --atomic --wait --wait-for-jobs --debug

Check the Helm documentation for more info about the helm upgrade command.

Uninstalling the chart

To uninstall the chart with the release name posthog in posthog namespace, you can run: helm uninstall posthog --namespace posthog (take a look at the Helm docs for more info about the command).

The command above removes all the Kubernetes components associated with the chart and deletes the release. Sometimes everything doesn't get properly removed. If that happens try deleting the namespace: kubectl delete namespace posthog.

Next steps

Now that your deployment is up and running, here are a couple of guides we'd recommend you check out to fully configure your instance.

  • Setting up monitoring with Grafana
  • Environment variables
  • Securing PostHog
  • Running behind proxy
  • Email configuration

Questions?

Was this page useful?

Next article

Deploying to Google Cloud Platform

First, we need to set up a Kubernetes cluster (see the official GCP documentation for more info). Note: in order to reduce the overhead of managing stateful services like PostgreSQL, Kafka, Redis and ClickHouse by yourself, we suggest you to run them outside Kubernetes and offload their provisioning, building and maintenance operations: for PostgreSQL, take a look at Google Cloud SQL for PostgreSQL for Apache Kafka, take a look at Confluent Cloud for Redis, take a look at Google Cloud…

Read next article

Authors

  • justinjones
    justinjones
  • Paul Hultgren
    Paul Hultgren
  • ellie
    ellie

Share

Jump to:

  • 1-click install
  • Securing your 1-click install
  • Install via doctl
  • Manual install
  • Upgrading the chart
  • Uninstalling the chart
  • Next steps
  • Questions?
  • Edit this page
  • Raise an issue
  • Toggle content width
  • Toggle dark mode
  • Product

  • Overview
  • Pricing
  • Product analytics
  • Session recording
  • A/B testing
  • Feature flags
  • Apps
  • Customer stories
  • PostHog vs...
  • Docs

  • Quickstart guide
  • Self-hosting
  • Installing PostHog
  • Building an app
  • API
  • Webhooks
  • How PostHog works
  • Data privacy
  • Using PostHog

  • Product manual
  • Apps manuals
  • Tutorials
  • Community

  • Questions?
  • Product roadmap
  • Contributors
  • Partners
  • Newsletter
  • Merch
  • PostHog FM
  • PostHog on GitHub
  • Handbook

  • Getting started
  • Company
  • Strategy
  • How we work
  • Small teams
  • People & Ops
  • Engineering
  • Product
  • Design
  • Marketing
  • Customer success
  • Company

  • About
  • Team
  • Investors
  • Press
  • Blog
  • FAQ
  • Support
  • Careers
© 2022 PostHog, Inc.
  • Code of conduct
  • Privacy policy
  • Terms